The Complete Water Damage Restoration Process Explained
The Complete Water Damage Restoration Process Explained
When water damage strikes your home, the restoration process can feel overwhelming and mysterious. What exactly are the technicians doing? Why does it take several days? What equipment are they using and why? Understanding the professional restoration process empowers you to make informed decisions, communicate effectively with your restoration company and insurance adjuster, and have realistic expectations about timelines and outcomes.
This article walks through the complete water damage restoration process from the initial emergency call to the final reconstruction, explaining what happens at each stage and why each step is essential.
Step 1: Emergency Contact and Triage
The restoration process begins the moment you call. A professional restoration company's intake team will ask you several critical questions to triage the situation: What is the source of the water? How long has the water been present? Is the water still flowing? Are there safety hazards such as electrical exposure or contamination? How large is the affected area?
Based on your answers, the company dispatches the appropriate crew with the right equipment. A small kitchen leak requires a different response than a whole-house flood from a burst pipe. For true emergencies involving active flooding, electrical hazards, or sewage contamination, most reputable companies target arrival within 30 to 60 minutes.
Step 2: Inspection and Damage Assessment
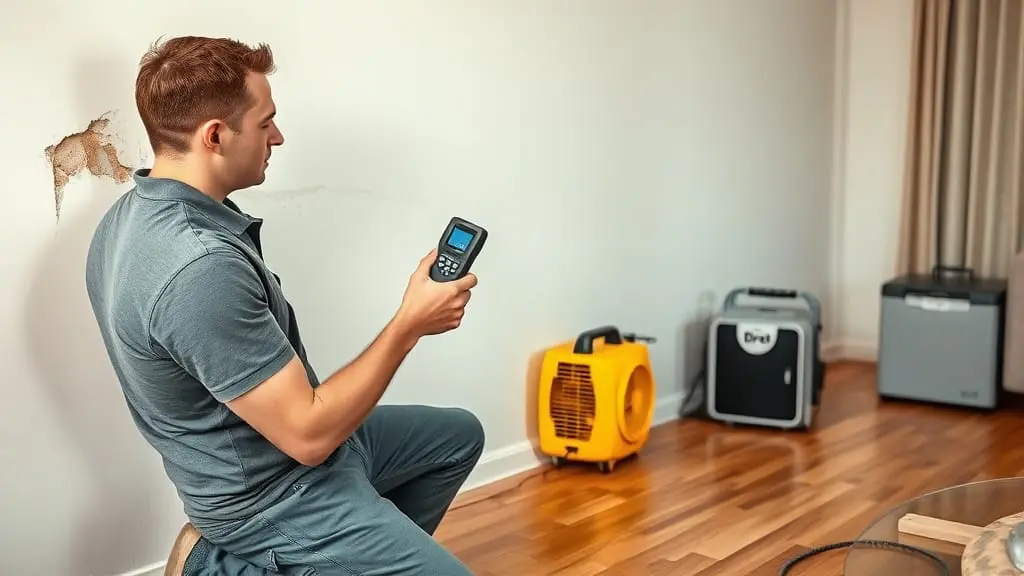
When the restoration crew arrives, the first thing they do is conduct a thorough assessment of the damage. This is not a quick visual scan. Certified technicians use specialized instruments to build a complete picture of the moisture situation.
Moisture meters: These devices measure the moisture content of building materials by either penetrating the surface with pins or using non-invasive electromagnetic technology. Technicians take readings throughout the affected area and adjacent rooms to map the extent of moisture migration. Materials are classified as either wet or dry based on industry-standard moisture benchmarks.
Thermal imaging cameras: Infrared cameras detect temperature differences in walls, ceilings, and floors. Wet areas are cooler than dry areas due to evaporative cooling, allowing technicians to see moisture patterns behind walls without opening them. This technology is invaluable for identifying hidden water damage that would otherwise go undetected.
Hygrometers: These instruments measure the relative humidity and temperature of the ambient air. Understanding the atmospheric conditions helps technicians calculate the evaporation potential and determine the appropriate drying equipment configuration.
Based on the assessment findings, the technician classifies the damage according to two industry standards: the water category and the water class.
Step 3: Water Category and Class Classification
The IICRC S500 Standard for Professional Water Damage Restoration establishes three water categories and four water classes that guide the entire restoration approach.
Water categories describe the level of contamination. Category 1 is clean water from a supply line or faucet. Category 2 is gray water from appliance overflows or toilet overflows with urine. Category 3 is black water from sewage, flooding, or water that has been standing for an extended period. The category determines what materials can be saved and what must be discarded, as well as the level of disinfection required.
Water classes describe the extent of absorption and the rate of evaporation needed. Class 1 involves a small area with minimal absorption. Class 2 involves a larger area with water that has wicked up walls less than 24 inches. Class 3 involves water that has wicked up walls more than 24 inches or has come from overhead. Class 4 involves deep absorption into dense materials like hardwood, concrete, or stone that require specialized drying techniques. The class determines the quantity and type of drying equipment deployed.
This classification is not just academic. It directly determines the scope of work, the equipment needed, the timeline for completion, and the cost of the project. It is also used for insurance documentation and ensures that the restoration approach meets industry standards.
Step 4: Water Extraction
With the assessment complete, the crew begins removing standing water. This is a race against the clock because every minute that water remains in contact with building materials increases the damage. Professional water extraction uses equipment far more powerful than anything available to consumers.
Truck-mounted extractors: These powerful systems can remove hundreds of gallons per hour. The extraction unit stays in the truck while hoses run into the home, pulling water out and pumping it directly into the truck's waste tank. For large-scale flooding, multiple truck-mounted units may be deployed simultaneously.
Portable extractors: For areas that truck-mounted hoses cannot reach, portable extraction units are used. These self-contained units are maneuverable enough to reach tight spaces and upper floors.
Weighted extractors: For carpet, specialized weighted extractors press down on the carpet to force water out of the pad and into the extraction head. This is far more effective than surface extraction alone because carpet padding can hold several times its weight in water.
Hard surface extractors: Different attachments are used for hard surfaces like tile, hardwood, and laminate. These tools are designed to remove water without damaging the floor surface.
Thorough extraction is critical because every gallon of water removed mechanically is a gallon that does not need to be evaporated during the drying phase. Effective extraction can reduce drying time by days, which means less equipment, less energy consumption, and lower costs.
Step 5: Removal of Non-Salvageable Materials
After extraction, technicians assess which materials can be dried in place and which must be removed. This decision is based on the water category, the material type, and the duration of exposure.
Porous materials that have absorbed Category 3 (black) water almost always require removal. This includes carpet, carpet padding, drywall, and insulation. For Category 1 and 2 water, porous materials can often be saved if they are addressed within the first 24 to 48 hours.
Common materials that typically require removal include saturated carpet padding (which rarely dries effectively), drywall that has been wet for more than 48 hours or that shows visible mold, wet insulation, particleboard cabinetry that has begun to swell, and any material contaminated with sewage.
Technicians typically cut drywall removal at least 12 inches above the visible water line to ensure all affected material is removed. This process, called a flood cut, exposes the wall cavity to air circulation and allows technicians to inspect and dry the studs, bottom plate, and any wiring or plumbing inside the wall.
Step 6: Structural Drying
This is the heart of the restoration process and typically the longest phase, lasting three to five days for most residential water damage events. The goal is to reduce the moisture content of all building materials to their pre-loss, dry-standard levels.
Air movers: High-velocity fans are positioned strategically throughout the affected area to create airflow across wet surfaces. This airflow accelerates evaporation by continuously replacing the moisture-laden air layer on material surfaces with drier air. Technicians typically place one air mover for every 10 to 16 linear feet of wall affected.
Dehumidifiers: Commercial dehumidifiers remove moisture from the air as it evaporates from building materials. Desiccant dehumidifiers use a chemical drying agent and can achieve extremely low humidity levels, making them ideal for cold or already dry environments. Refrigerant dehumidifiers condense moisture from the air using a cooling coil and are highly effective in warm environments. The capacity and type of dehumidifier deployed depends on the volume of the affected space and the atmospheric conditions.
Specialty drying equipment: For Class 4 water damage involving dense materials like hardwood, plaster, or concrete, technicians may deploy specialty drying systems. Injectidry panels use a vacuum to pull air through wall cavities. Floor mat systems create sealed drying chambers over hardwood floors. Heat drying systems can accelerate evaporation from concrete slabs and other dense materials.
Daily monitoring: A certified technician returns daily to take moisture readings and adjust the drying equipment as conditions change. As materials dry, the equipment configuration needs to be modified to maintain optimal drying conditions. The technician documents moisture readings in a drying log that tracks the progress of each affected material toward its dry standard. This documentation is important for both quality assurance and insurance purposes.
Step 7: Cleaning and Sanitizing
Once the structure is dry, all surfaces in the affected area are cleaned and treated with antimicrobial agents to prevent mold growth and eliminate odors. The level of cleaning depends on the water category.
For Category 1 water, surfaces are cleaned and treated with a preventive antimicrobial. For Category 2, more aggressive cleaning with disinfectants is required. For Category 3, all surfaces that were in contact with the contaminated water must be thoroughly cleaned and disinfected with EPA-registered products designed for biohazard remediation.
If the water damage involved flood water or sewage, technicians may also apply odor counteractants or perform thermal fogging to neutralize persistent odors that can linger in building materials even after cleaning.
Step 8: Reconstruction
The final phase of restoration is rebuilding what was removed during the drying process. This may include hanging new drywall, painting, replacing baseboards and trim, installing new carpet or flooring, replacing insulation, and restoring any other materials that were removed or damaged beyond repair.
The scope of reconstruction varies widely depending on the extent of the original damage. Minor events may only require replacement of a small section of drywall and baseboard. Major events can require rebuilding entire rooms, including flooring, walls, ceilings, and cabinetry.
A full-service restoration company handles both the emergency mitigation and the reconstruction phases, providing a single point of contact throughout the entire process. This simplifies communication, ensures continuity, and streamlines the insurance claims process.
Working With Insurance
Throughout the restoration process, your restoration company documents everything for your insurance claim. This documentation includes the initial assessment and classification, moisture readings and thermal images, a detailed scope of work, daily drying logs with moisture readings, photos of all damage and all work performed, and an itemized estimate using industry-standard pricing software.
A reputable restoration company bills the insurance company directly, so you typically only pay your deductible out of pocket. The company's estimator works with your insurance adjuster to agree on the scope and pricing, minimizing the burden on you during an already stressful time.
Timeline Summary
- Day 1: Emergency response, assessment, extraction, and deployment of drying equipment.
- Days 2 through 5: Structural drying with daily monitoring and equipment adjustment.
- Day 5 or 6: Final moisture verification, equipment removal, and cleaning and sanitizing.
- Following weeks: Reconstruction and finishing work as needed.
The exact timeline depends on the severity of the damage, the materials involved, and environmental conditions. Your restoration company will provide a specific timeline estimate based on your situation.
Understanding this process helps you know what to expect and why each step matters. At 2 Brothers Restoration, we walk every homeowner through the process at the start of the job, answer questions throughout, and provide clear updates on progress. If you have experienced water damage in the Fort Worth area, call us for a fast, professional response backed by IICRC-standard practices and genuine care for your home.
Get Priority Response
Step 1 of 3Have an Emergency?
Do not let water damage sit. We are available 24/7 to take your call.
(817) 607-3264